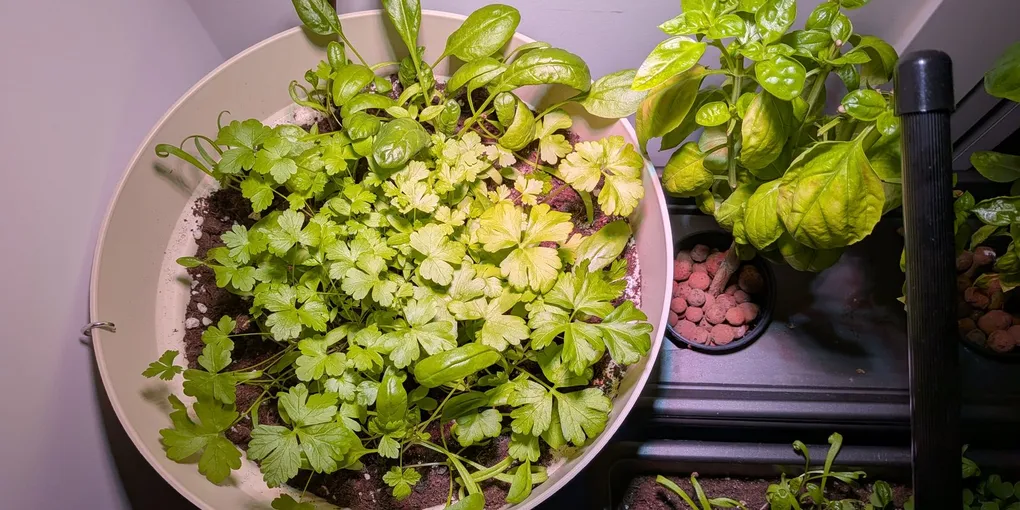
An old cooking pot as a planter: parsley and winter spinach, oregano on its own, and an LED lamp on Home Assistant
TL;DR
- I turned a spare cooking pot into a planter for parsley and winter spinach. Oregano got its own small pot because it likes dry, poor soil.
- A cooking pot has no drainage, so drill 5-6 holes in the base or the roots rot.
- A cheap USB clip-on lamp is enough for leafy herbs, not for tomatoes or chillies. It uses far less power than the box claims.
- I run the lamp on a smart plug and switch it on a schedule with Home Assistant. My first automation failed over one stray dash.
Continue reading
What you need
- Old stainless steel pot or saucepan, about 20 cm deep
- Drill with an HSS or cobalt metal bit (or a holed pot that fits inside)
- Cutting oil or a few drops of machine oil
- All-purpose potting mix for vegetables or herbs
- Perlite
- Coarse sand (for the oregano)
- Small pot with drainage holes (for the oregano)
- Parsley, winter spinach and oregano seeds
- Clip-on LED grow lamp with two flexible arms, USB powered
- Smart plug with energy monitoring
- Saucer or tray to catch water (optional)
Three seed packets, one pot, and a split
I had seeds for oregano, parsley and a “giant winter” spinach, plus a cooking pot I didn’t need anymore.
Not everything fits together. Oregano is Mediterranean: poor soil, fast drainage, dry between waterings. Parsley and spinach want rich soil that stays moist. Together, you drown one or leave the others thirsty.
So the pot gets spinach and parsley. Oregano goes in its own small pot, in a mix with 30-40 % sand or perlite.
A cooking pot doesn’t drain
Water pools at the bottom and the roots rot. Two ways around it.
Drill the base: 5 or 6 holes of 6-8 mm. Stainless steel is hard; go slow with an HSS or cobalt bit and a few drops of oil so it doesn’t burn. The long-term fix, and the one recommended to me.
Or use it as a cover pot: a holed pot inside, emptied after each watering. No drilling, but forget once and the roots rot.
Sowing, and where the pot lives
Potting mix with 20 % perlite.
Winter spinach: 1-2 cm deep, about 10 cm apart. One of the most cold-tolerant vegetables; September is a good time to sow.
Parsley: 0.5-1 cm deep, in the middle or along one side. 3-4 weeks to germinate, so the spinach is up long before. Taproot, so it needs about 20 cm of depth; a cooking pot has plenty.
Oregano: tiny seeds. Scatter on the surface, uncovered or barely covered; they need light to germinate.
Indoors or out? This changed the plan. Under my cabinet’s PAR30 bulbs of about 9.5 W, spinach and parsley would be short on light. A very bright window or the balcony suits them better.
I live in Vitoria, in northern Spain, and with our winters both are fine outside. Oregano is better indoors or sheltered.
The new lamp and the mystery of the watts
I bought a two-arm flexible clip-on lamp with USB power. No wattage on it, and searching the model turned up no reliable spec sheet.
Box wattage is almost always inflated. Some manufacturers put the safe maximum for a clip-on at about 10 W per head, so two-arm models are typically 10-15 W real in total, even when the listing says “40 W” or “80 W”. Over 5 V USB there isn’t room for much more.
The real number, most reliable first:
- An energy-monitoring smart plug: the only figure I’d publish, because I measured it.
- The USB adapter label, volts times amps: 5 V × 2 A = 10 W at most. A ceiling, not the actual draw.
- The order’s product page, under technical specifications.
10-15 W across two arms covers germination and light leafy crops (parsley, spinach, basil) at 15-25 cm. Not a fruiting tomato or chilli; those need far more.
Scheduling the lamp with Home Assistant
The lamp runs off a smart plug (switch.media_socket_1 in my Home Assistant). I wanted it on at 23:00 and off at 11:00: 12 hours of light.
I got this wrong first. What I pasted into the automation’s YAML editor started with - alias: "Luz LED - encender 23:00", dash included, and it failed.
Automation YAML lives in two places. The single-automation editor (Settings → Automations → open one → three-dot menu → “Edit in YAML”) takes one automation, no leading dash. The automations.yaml file (over SSH or the file editor) is a list, so there each one starts with -. I’d mixed them up.
Two separate automations fix it. Create one, open “Edit in YAML” and paste:
alias: "LED light - on 23:00"
trigger:
  - platform: time
    at: "23:00:00"
action:
  - service: switch.turn_on
    target:
      entity_id: switch.media_socket_1
And a second one to turn it off:
alias: "LED light - off 11:00"
trigger:
  - platform: time
    at: "11:00:00"
action:
  - service: switch.turn_off
    target:
      entity_id: switch.media_socket_1
Swap switch.media_socket_1 for your plug’s entity. Newer Home Assistant versions write triggers: / trigger: time and actions: / action: switch.turn_on; the old syntax still works, which is why the editor may rewrite it on save.
FAQ
Can I plant in a cooking pot without drilling holes? Only as a cover pot with a holed pot inside, emptied after each watering. No drainage means rotten roots.
How many watts does a USB clip-on LED lamp use? Usually 10-15 W real in total, even when sold as 40 or 80 W. Measure it with an energy-monitoring smart plug.
Why won’t Home Assistant accept my automation YAML?
Usually the leading -. It belongs in automations.yaml, a list, not in the single-automation editor.